It’s easy to build your own chamber.
Space
Find a sound reflective space.
Gear
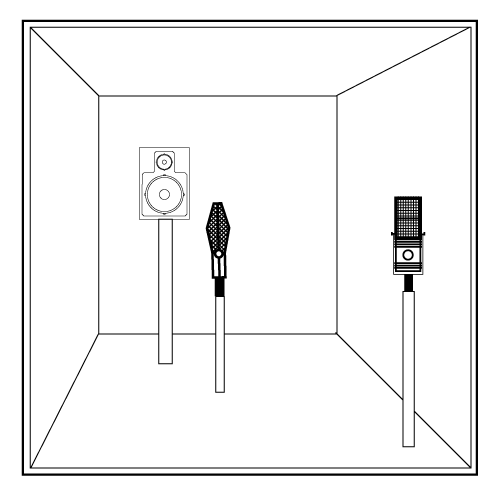
Setup your loudspeakers and microphones.
Audio
Run your chamber like a plug-in.
Choose Your Reverberant Space
- Highly Sound Reflective
- concrete
- brick
- stone
- tile
- glass
- Typically Sound Diffusive / Irregularly Shaped
- stairs
- book cases
- columns
- non-parallel walls
- Hopefully Quiet
- massive construction types
- sound isolating doors
- no/few windows
- no HVAC, or turn it off when working
- work at night
- Larger = More Reverberant
- Close the Door! Any opening lets sound energy out, shortening your reverb.
| SPACE | PROS | CONS |
|---|---|---|
| Bathroom | With tile, glass, porcelain, vitreous china, and other non-porous, waterproof materials, this space likely contains the most sound reflective surfaces of any room in the typical residence. Remove sound absorbing towels, mats, shower curtains. Open any shower doors to let sound into that uniquely reflective space. | Try not to get things wet, please. |
| Garage | Pairs a highly sound reflective floor with typically higher than average ceiling height, thus a high cubic volume. | Parallel walls will lead to flutter echo and other artifacts. Arrange garage clutter (tools, storage bins, garden equipment, recycle bins) along walls for sound diffusion. |
| Basement | With stone, brick, and/or concrete floor and walls, it offers large areas of sound reflective surfaces. | The ceiling is often highly sound absorptive. Water heaters and HVAC systems are noisy. |
| Stairwell | High cubic volume, sound diffusive steps. Close all doors on all floors. | While steps offer diffusions, parallel walls still present flutter echo challenges. |
| Hallway | The longer the hallway, the longer the delay (1 ft = ~1ms), with added ambience. | Not typically sound reflective surfaces, so this is more about delay, with slight liveness. |
| Kitchen | More sound reflective and diffusive elements (appliances, counters, cabinets, floor) than typical bedrooms or living rooms and other non-bathroom residential spaces. | Noisy appliances. Use the chamber in between refrigerator cycles, or mask with other signals. |
Setup Your Gear
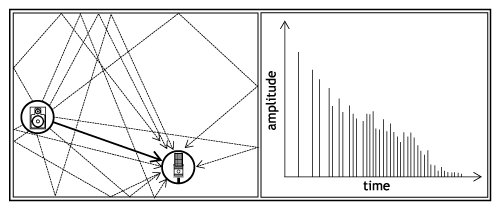
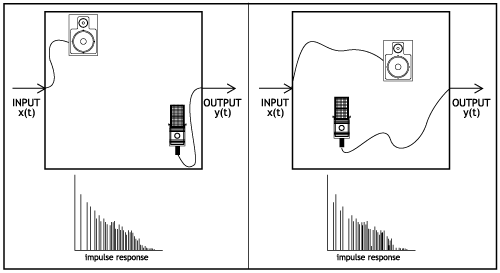
Strive to minimize the direct sound from loudspeaker to microphone.
- Loudspeakers
- dynamic range: ability to energize your space
- frequency response: much less important as we typically rolloff lows and highs on the send to any chamber
- directional (horn loaded) loudspeakers can be helpful for directing energy in creative ways within your chamber.
- Microphones
- Typical room microphone placement strategies apply.
- Directional microphones can be helpful
- point away from loudspeakers
- ie, aim null at loudspeakers
- rewards placement experimentation
- Condensers are typical, but any transducer type will do.
- Placement
- Avoid line-of-sight connection between loudspeakers and microphones
- Goal: 100% wet. Get the sound of your chamber, not the souce signal directly.
- Direct speaker-to-microphone signal acts as an almost 100% dry element, but with the coloration due to loudspeaker and microphone choices, plus delay due to propagation distance. This all undermines the quality of your chamber in your mix.
- Any intervening partition or object (the bath tub, the shower door, a wheel barrow, etc.) can attenuate the direct/dry sound reaching your microphones.
- Loudspeakers: place to best energize your entire space.
- Microphones: place to best capture the full diffuse sound of your space.
- Of course, experiment and try odd placements.
- Avoid line-of-sight connection between loudspeakers and microphones
| LOUDSPEAKER | PROS | CONS |
|---|---|---|
| Small Sound Reinforcement Monitor or Foldback Monitor | High power handling capability to fully energize your space. Repurpose gear from live gigs for this studio effort. Often horn-loaded, offering power efficiency and directionality. | May be inconveniently large for many chambers. |
| Guitar Amp | High power can fully energize your space. | Limited bandwidth. good: bass amp better: guitar amp best: keyboard amp |
| Spare/Old Studio Monitors | You’re not using them anyway. | Be careful not to overdrive them. |
| Spare/Old Home Stereo or Find a Cheap Used One | A simple receiver and pair of speakers will do the job, at an affordable price. | Limited power, may not work for large chambers. |
Route Your Audio
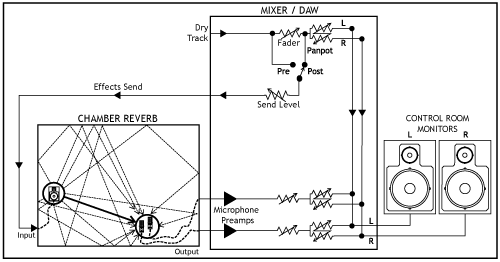
- Aux Send
- Aux Send to Analog Out of your DAW to Power Amp / Powered Monitor In
- Not an insert
- Aux Send Bus let’s you send multiple source tracks at different levels to your chamber.
- Some Lead Vocal
- More Background Vocals
- Less Acoustic Guitar
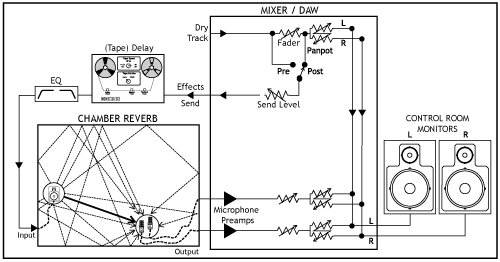
- Pre-Delay
- Insert a Delay on the Aux Send bus
- As little as 20 ms
- 75 to 150 ms is more typical
- Elvis (Sun Studios) used about 139 ms
- Try Tape delay if you’ve got it
- Feel free to push the delay time even higher, 200 ms to 500 ms or more
- At long pre-delay times, you might tune the delay time a musically valid value
- 1/16th note
- 1/8th note
- 1/4 note
- dotted and triplet values
- EQ
- Insert an EQ/Filter on the Aux Send Bus
- The send to most chambers is filtered (99.995% of the time, maybe more)
- Small rooms have modal resonances
- filter out those frequencies on the send to your chamber to avoid the unpleasant ones
- but don’t filter out the quirky resonances that you find flattering to your source signal
- Most chamber speaker/room/microphone systems are unlikely to be flat from 20Hz to 20kHz, and yours is no exception. This is not a problem. Embrace that and consider a high pass filter from 200 Hz to as high as 800 Hz, and/or a low pass filter from 10 kHz to as low as 6 kHz.
- Narrowing the frequency range of the chamber reverb to an interesting middle and upper middle frequency range not only better suits the space and the gear available for the typical chamber, but also prevents your reverb from being a wide blanket of masking that obscures the rest of your mix.
- Aux Input/Aux Return
- Your microphones feed microphone preamplifiers that return live to your mix
- via Aux Inputs, or
- Spare monitor paths.
- Pan and add additional FX as desired to your chamber reverb returns.
- Your microphones feed microphone preamplifiers that return live to your mix